Update: I was getting ready to post this last night, was just trying to decide on mortar for the floor. I went up to take a peak under the floor register to see what the subfloor looked like, and I was shocked to find that the donkeys who laid the tile, just troweled some sort of adhesive right on top of the plywood subfloors, rather than a proper underlayment. This changes everything. There’s no chance of me cleanly removing this and shoring it up properly with the vanity in place. I most likely want to pull the tub too, in order to really get this crap out. In a perfect world, I can scrape this shit down to clean plywood, then continue my plan of laying thinset->1/4″ cement fiber board->thinset->tile. Worst case, I have to rip out the subfloor completely and redo it properly.
I can’t say that I’m that upset about this. At first I was pissed, cuz this totally threw a wrench in my plans. However, I’m actually now excited about the prospect of a full remodel in there now. It will help resale, and we’ll enjoy it more. So new vanity, and likely new tub are now in the mix!
When I started seriously looking into this a couple of weeks ago. I took some quick measurements to get a basic idea of what I was working with. Once I started looking into the actual process, I realized that I actually needed several measurements, and maths. More on that as we go. Let’s get into the product selection.
Like most, my first stop was home depot. I had some tiles picked out, but their selection is really limited, so finding all the right trim and such wasn’t going well. So I started searching for more places and came across Floor & Decor. They’ve got a massive selection, and really good pricing. I started putting together my shopping list for just the tile, and was impressed with myself at how cheap this project was. HAH! Things get more complex and expense under the tile.
This is the first place where we need those extra measurements. Tile comes in many shapes and sizes. Additionally, it can be spaced (where you grout) in a variety of sizes. Anywhere from 1/16″ – 1/4″ are common depending on the application. These measurements, as well as the tile arrangement, need to be factored into your total. Just because you are tiling a 50 sq. ft space does not mean 50 sq. ft of tile. In my case, the total area being tiled in the tub surround is about 46 sq. ft. However, the outer edge of that will be bullnose trim in a single row, so a linear measurement is needed there rather than the area. While this is only a small amount, it can skew your numbers a good bit.
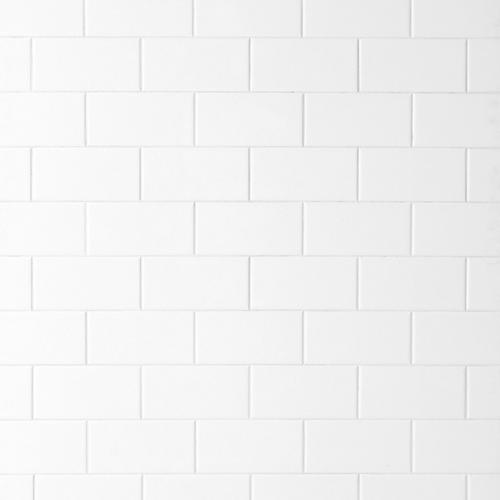
The tile selection was relatively easy. I already knew that I wanted to do a simple classic design here. Subway tiles in the tub surround, with bullnose trim. I plan to place it pretty close to where the existing tile is. A quick look at the options, and I decided on this 3×6 subway tile and coordinating 2×6 bullnose. All in for the wall tile, it’s a little over $100 including a good amount of extras for cutting/breakage. It really can’t be beat at that price.
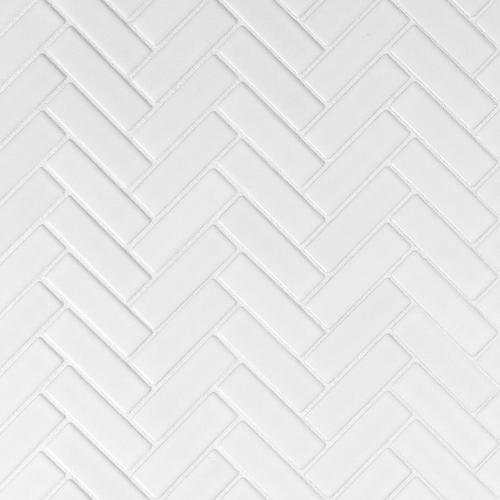
For the floor, I was a little less sure. I originally had my mind set on a black and white octagon mosaic to get that classic look. But after looking at it for a while, I decided it was a bit too busy for this space. I’ll likely use it in the half bath downstairs when I get around to that one. We started looking at other options. While Floor & Decor has really good prices, floor tile is not nearly as cheap as wall tile. This is not a bathroom that I want to spend a lot of money on, but I obviously still want it to look nice and use quality materials. With that said, I decided I wanted to spend no more than $5/sq. ft. There were plenty options that we liked well above that price range, but we ultimately decided on this porcelain herringbone mosaic which is still relatively cheap.
The final tile bits will be the baseboards. We currently have Cove base tiles in there, so I’m just going to replace those with these subway matching bright white tiles.
Next up was grout. When I was gonna do the black and white tile, my plan was white grout on the walls and floor. But one of the reasons we decided on this herringbone tile, was to add a little contrast without being as busy as the black and white floor would be. So we chose this light grey color which should give us that subtle look we’re going for.
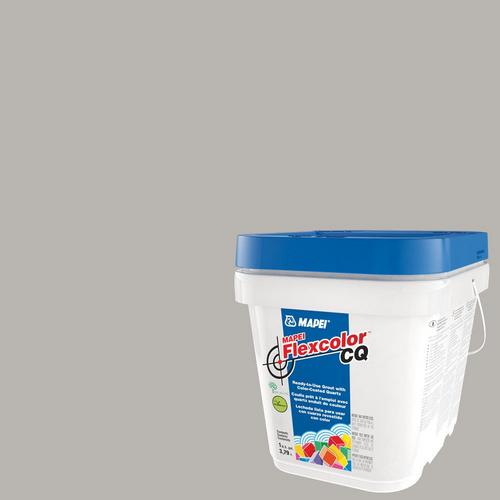
Also of note, I chose this specific type of grout after a lot of reading. It and the other big pre-mixed brand Fusion Pro get a lot of mixed reviews. Much of it comes from people who don’t know how to follow directions, or who are cheap. This is not a cheap product at all. It costs significantly more than the unmixed grout bags, but it has a couple big benefits. One is obviously the convenience of not having to mix up small batches of grout at a time and throwing it away when it dries out on you. Second is that it doesn’t require sealant. Additionally, since it’s not dyed, the color wont bleed or stain, nor will the be the inconsistency between batches. It can also be reapplied on top of itself, which is nice if you have to go back and touch up or continue on the next day. They also make color matched caulk which I will be using to seal the different materials together.
Working backwards from the tile, the next product is morter/thinset, but I’m going to skip that for now as I’m still deciding, so let’s talk about backer board. This can be anything from cheap drywall (should pretty much never be used anywhere in a bathroom), all the way to the latest foam backer boards. In my remodel, I plan to rip out everything in the tub surround from the tub lip all the way to the ceiling, down to bare studs. Then on the floor, assuming that the subfloor is in decent shape I’ll leave that in place and put backer over it.
Initially, I thought I was going to use fiber cement boards. They’re fairly cheap, and work well in that environment. However, they are really heavy, difficult to cut (especially the little cuts needed for pipes & valves), and still require additional waterproofing. I then discovered foam backing boards. These are made of a foam core and a water/vapor proof face. They weigh roughly 10% of a fiber cement board. This is a big deal! All you have to do is screw them in, then fill the seams and screws with sealant. The downside is the cost. They are about 3 times as expensive as cement board. After reading up, and watching install videos, I’ve decided that it’s worth the added expense for me in the time/labor savings. Based on cost and availability, I chose to go with the USG Durock Ultralight Foam Boards I’ll probably still use the hardibacker on the floor since it doesn’t need the same treatment.
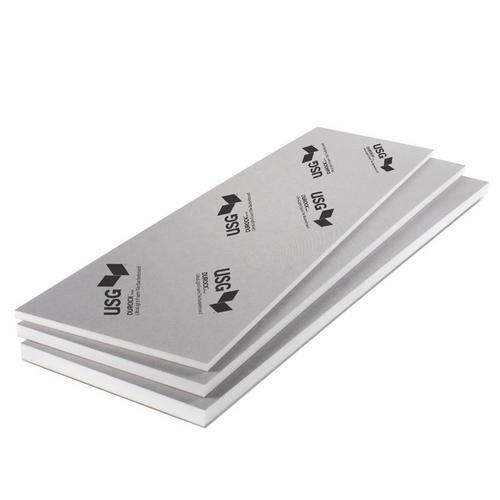
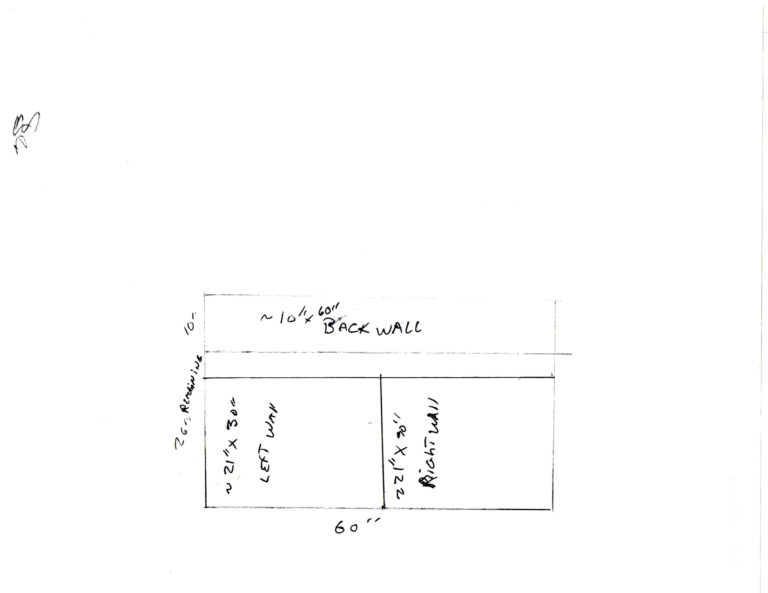
This was also an area that I got a bit tripped up on numbers/maths. These sheets come in different sizes, with the most common being 3×5 ft & 4×8 ft. At first my measurement for the long side of the tub was around 58″. It wasn’t immediately obvious to me that the backer on that wall is actually behind the 2 side walls so add another 1/2″ on each side. And since tubs are standard sized at 60″, it makes more sense why those sheets are 3×5 ft. Knowing that, makes it a bit easier to calculate how much we need. Two of those and a cut off of another take care of that wall. The other two walls were a bit more difficult to calculate in my head. I had to actually draw a sheet on paper and mark the measurements I’d need to cut to figure out if 5 sheets was enough.
That’s about it for now. I have my plumber coming out to give me an estimate on the new potential work of a tub drain and converting the single sink to double. I plan to start doing some demo at least in the tub surround in the next week. Then I’ll pickup all of my supplies. The plan is to do the bulk of the work over Thanksgiving week, since I’m already taking the whole week off. Ideally, I can get some of the tub work done before then, so I can focus on getting the floor done that week. Losing the toilet up there is gonna be hard for Jax, so I want to try and minimize the days that I have it pulled. Stay tuned!
You must be logged in to post a comment.